
Alright, with that out of the way, if anyone is interested, I made a pdf worksheet you can download here to customize the pattern. Why don't I just give you the measurements? Well, I don't want to get into any trouble (that copyright thing) and after making this pincushion three times, I came out with three slightly different measurements. So, these instructions will allow you to make the adjustments necessary for your interior tube fit the ball. Use the download instructions first to calculate your measurements (you will also need the book for the pattern and instructions). The photos below just illustrate some of the steps.
In addition to the supplies listed in the book and your typical sewing notions (rulers, etc.), you will need a drafting compass, some tracing paper (I used vellum) and a calculator. Yes, there is a little geometry involved, but it's simple stuff. You remember pi, don't you?

This is my drafting compass. There are other varieties, but any should work for this method as long as it has a point on one end and a pencil on the other.

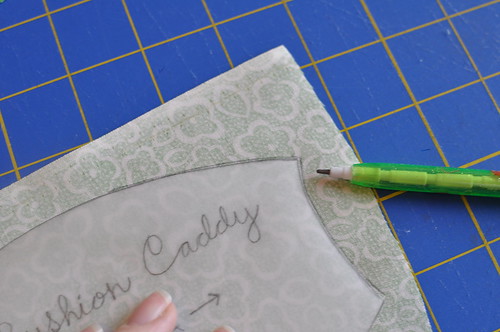
Trace pattern piece 1A from the book. If you use these instructions, this is the only pattern piece you will use from the book. You'll create the others after sewing your ball together.
Trace the shape on to your eight chosen fabrics and carefully cut them out.

Make sure they are turned the same direction. The pattern piece is not symmetrical.
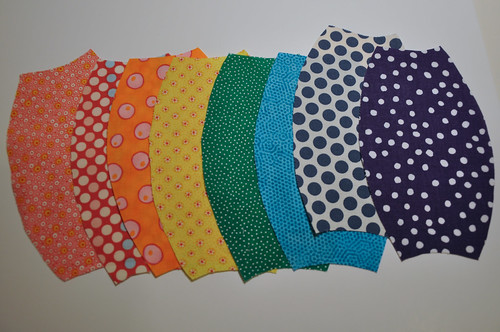
Here are my shapes cut out and ready to sew.

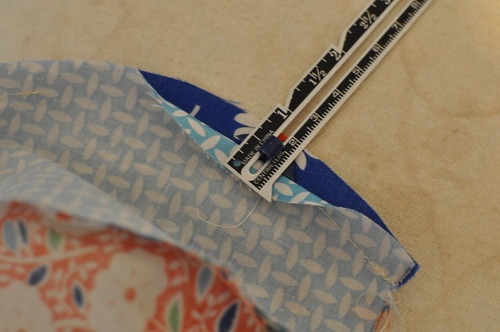
Sew these together using the instructions in the book with a 3/8" seam allowance. The 3/8" line on my machine didn't extend forward far enough, so I used a sticky note to extend it.

All eight sections sewn together.
After Step 12 in the book, fold and press the seam allowances of the opening back 3/8". This will make it much easier when it's time to sew it closed.
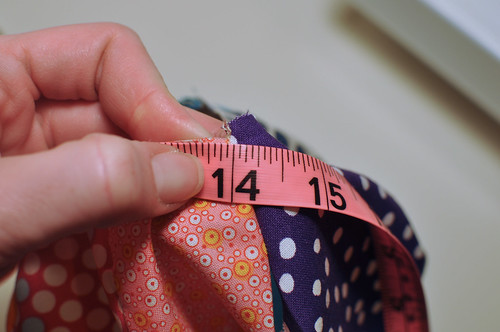
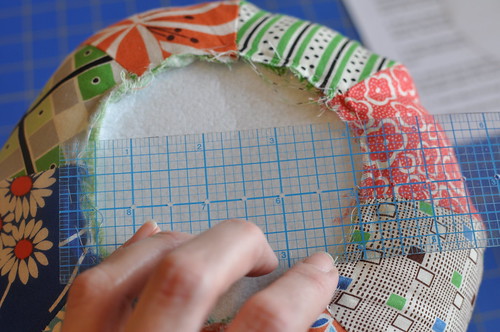
Carefully measure all the way around the opening of the ball with a flexible tape measure. Use the instruction sheet (Steps 4 through 6) to calculate the measurements for the interior tube and interfacing.
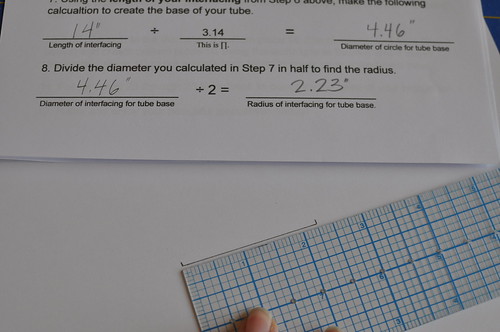
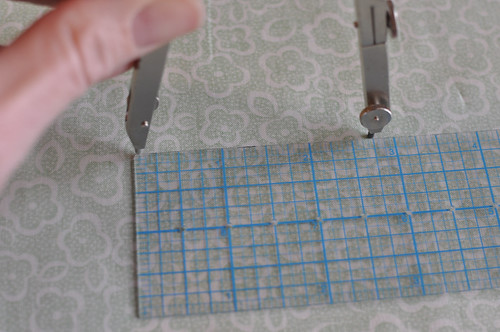
When you get to Step 7 on the instruction sheet, you'll draw a line that represents the radius of the tube base interfacing. My line needed to be 2.23", but I just used 2.25". Close enough.
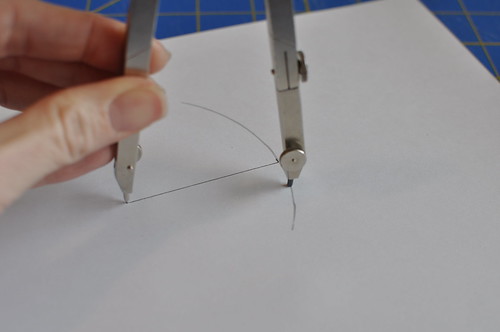
Use your drafting compass to draw this circle by placing the point on one end of the line and the pencil on the other. Rotate the compass to complete the circle.

This will be the pattern piece for your tube base interfacing. Don't use my measurements, be sure to measure your ball and calculate your measurements.

You'll use the same technique to draft a circle for the tube base fabric.

This is the interfacing I used. It is really thick. I bought it at JoAnn a while back, but I'm sure it's still available.

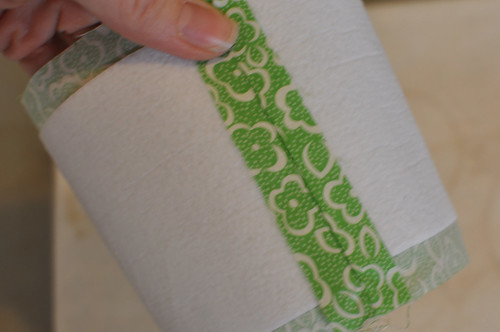
Cut out the fabric and interfacing for the tube base along with the tube fabric and tube interfacing (not pictured). You'll use the book's instructions to sew the tube and attach it to the ball, but I've got a few tips.

I used rulers to ensure that the interfacing was centered on the tube (1/2" seam allowances).

Make sure the needle is as close as possible to the interfacing when you sew the tube closed. I had to lift the presser foot slightly to help it onto the interfacing.
If you used double-sided fusible interfacing, just iron the seam allowances down. If not, you'll need to baste them per the book.
Here's what it looks like at Step 19 in the book.
Again, make sure the needle is as close as possible to the interfacing and try to smooth out the puckers. I still got a few tiny puckers despite my best effort, but I think it comes from the ball not being pulled down away from the seam, not because it doesn't fit. This step is tricky.

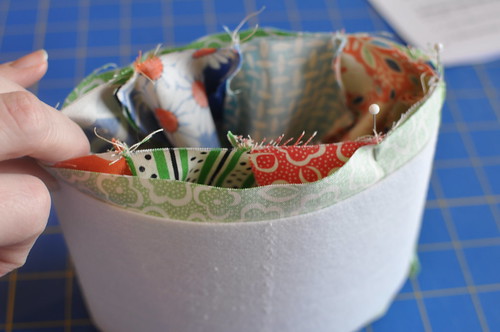
I found it easier to turn the ball to the outside if I first folded the seam allowances down around the tube. The fit is very tight.

Placing the tube base inside the tube.
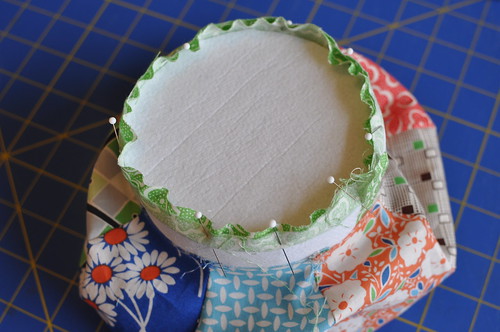
I pinned it in place before hand sewing.
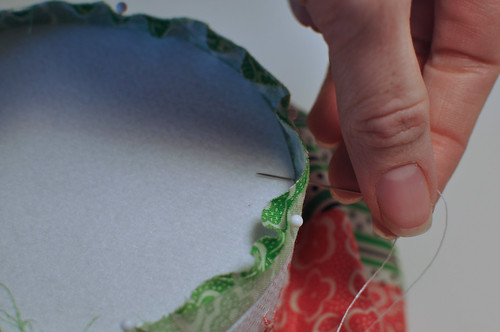
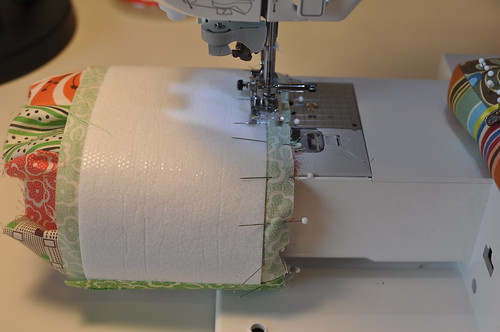
When you sew the base to the tube, be sure to get the needle as close as possible to the interfacing.
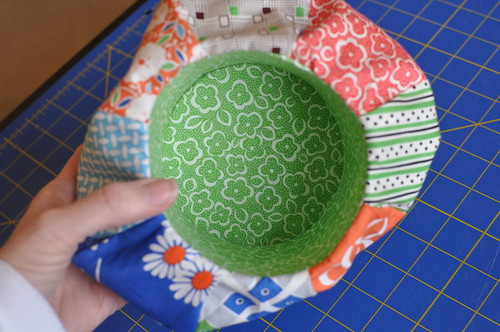
The completed interior tube!

Basting the seam allowances and bottom edge of the ball together.

Pull the stitches tight to cinch the ball around the tube base and secure.
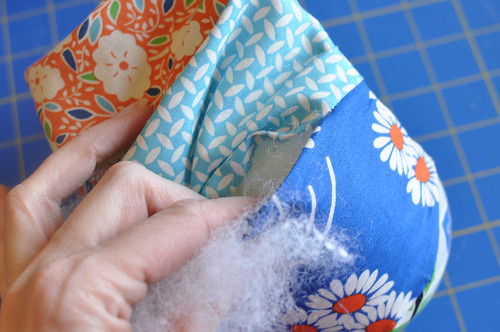
Stuffing! If you have enormous hands like me, be sure to fill the side opposite the opening before you fit a container inside the tube to help it hold it's shape.

I found a popcorn jar in my recycle bin that fit perfectly. I'll bet you can find something in your pantry that will fit. Keep this in place while you stuff the ball. You want it firm, but if you overstuff it, the interior tube will start to lose it's shape.
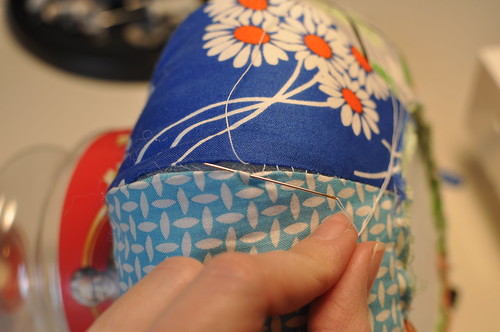
If you pressed the seam allowances back when you sewed the ball together, slipstitching it closed is a breeze.
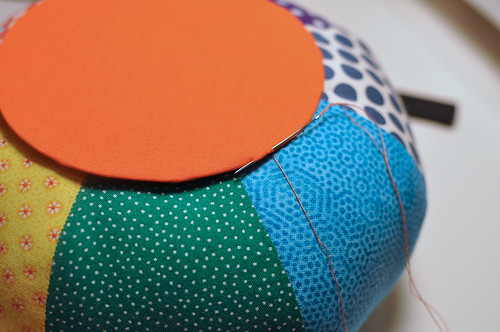
Measuring the bottom for the poster board.

I drafted this circle directly onto my "poster board", which is actually a cereal box I found in my recycle bin.

Check the fit to make sure the board covers your stitches on the bottom.
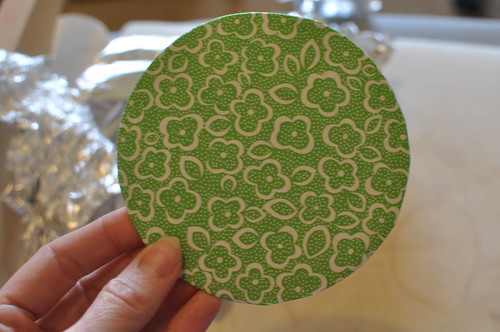
I got really lazy and drafted this circle directly onto the fabric for the bottom.

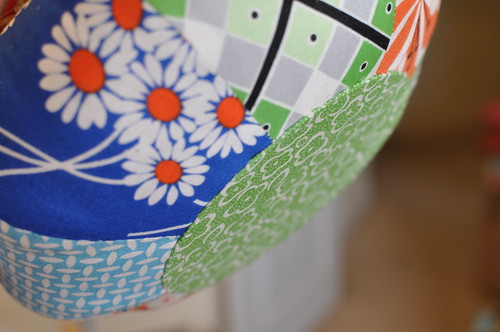
Use the technique on page 57 in the book to fit the fabric around the base. Yes, that cereal was Lucky Charms.
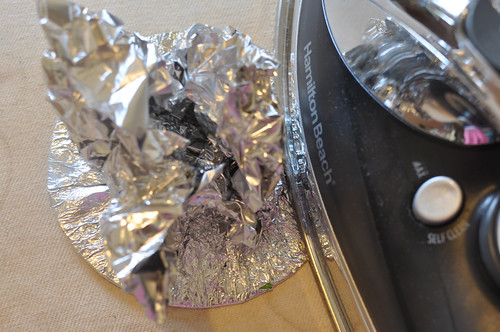
Ironing...
Perfect!
I basted around the edge of the fabric for the bottom and secured the thread so it wouldn't slide around while I sewed it on.
Slipstitch the bottom in place.

Still sewing...
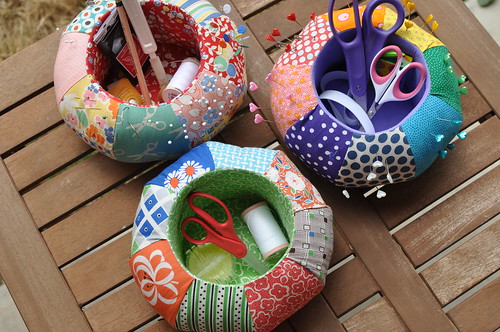
And all of a sudden, you're finished!
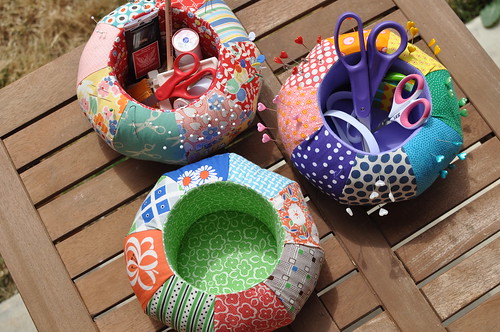
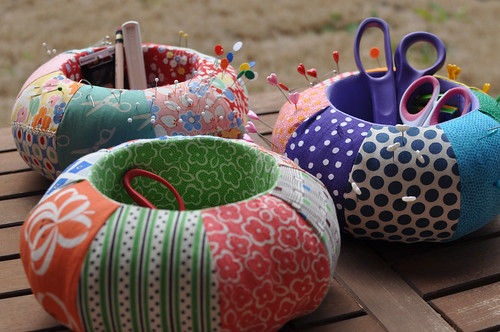
Shea is taking her pincushion (the rainbow polka dot version) to sewing class on Monday. She already organized her pins on it by color. I used mine last night while I watched TV and stitched the binding on some place mats. It's really handy!
I hope that was helpful! Let me know if you have any questions. Enjoy your weekend and your pincushion caddy!
40 comments:
Ya know, you started talking about doing this cool pincushion on your previous post, and I thought, boy, I hope she shares her problem-solving ideas with us.
You read my mind! (and probably others, too!)
Thank you, Melanie!
Cool, thanks for this Melanie. Looks like great instructions and I'm sure you've saved everyone some time and frustration with this pattern. I'll give this pattern a go soon.
Wow, they look fantastic. I ran into the same trouble as you initially and found your blog when looking for a solution online. Thanks for the advice.
Thanks Melanie, for this great tutorial plus trouble-shooting!! The caddies looks beautiful, i just love the fabrics you chose..
claudia.
I'm dumbfounded! How in the world did you manage to make 3 of these wonderful pincushions?! Do you think that with your instructions, a newbie like myself might be able to tackle the project now?
Wow, this will be so helpful if/when I tackle this again. The two I made "from the book" are so wonky! Now that I've seen how well yours turned out, I may have to make another... it's such a useful design.
Thank you so much for sharing your solutions to this very frustrating project. I made one and was just so disappointed with the way it turned out. I had figured out to make the tube longer, but was too lazy to make the circles fit it. Now I know it can be done. Can't wait to try it again!
What beautiful pincushions you made! Your tutorial is wonderful. Isn't it a shame that the author of the original was so lax that it took you doing all this work to make it more manageable for the rest of us. Thank you for all your help!!
Wow, thank you so much for posting your modifications for this project. I followed the instructions exactly (including the corrections she posted on her website) and it still wasn't working. Now it will!! Thanks again :)
Thank you so much for the awesome pictures! I have this book and LOVE it, but this project really intimidated me. As fine a reader as I am, pictures really make it so much more simple. I have been really loving your blog! We are getting ready to move back to Texas (San Angelo), so who knows? I may see ya someday...but not in a creepy manner. ;o)
melanie, u are so clever!!! Thanks a lot for all the trouble making this tutorial so clear. I have the pattern in old BHG mag by Anna Maria....I want to make 1 just like yours...wooo hoooo!
Thank you so much for posting all your tips in how to make this turn out well, I really appreciate it!
Susan/FlossieBlossoms
So cute and so practical! Love all your fabrics and bright colors! Thanks for sharing your tips on how to use this pattern...very nice!
MGM
love the pincushion, thanks for the help, now to get the book!!
I don't think I would have made this pattern if I hadn't had your help. It was a bear to make. Thank you so much for all the work you put into making it doable, I really appreciated the help.
This pattern is available free online. I never attempted it b/c so many people complained that it didn't work out. Thank you for taking the time to share your process to make the pattern work. Maria Horner should really take the time to publicly correct her pattern. She has posted some comments regarding the pattern & complaints. I love her work, but I wonder if she created the pattern, given that she has not corrected it.
These are awesome and darling, what an great tut. Thanks so much.
I will definitely make at least one, and when I do I will show it and link back. Thanks so much, I am happy to find this blog! Have a great day.
I only wish I had had your tips on making the caddy when I made 12 of these last year. I was so disappointed in Ms. Horner's instructions that I vowed never to make these again. I even threw out the free pattern from a magazine. I may have to try it again with your techniques. Thanks for sharing your efforts with us.
Bless you. I was about to lose my mind over this pattern and your additional instructions saved the day!
Bless you. I was about to lose my mind over this pattern and your additional instructions saved the day!
So glad I found this! Wish I had known these issues going in, as mine suffers. One thing that really helped me to deal with the wonky inner tube that you end up with the pattern as written, was to spray the inside of the completed caddy generously with water, then put a jar, cup, etc. that fit the cylindrical shape snugly, then microwave it for about a minute to heat up the moistened interfacing. Then you can leave it to dry and reset overnight with your jar holding the shape. Hope that helps someone who stumbled onto this too late.:)
I just stumbled across your blog online, and I'm in love with these! I was wondering, however, one of them has adorable heart-shaped pins sticking out of it - where are those from?!
I want to say thank you for taking the time to do this and write it out. Very thoughtful to share this with your readers. You totally inspired me to make this. I did not have the pattern last night but wanted to make it. I started fiddling with some pieces and so far it looks like it may come together but I am not sure yet. THis morning in an effort to make sure I get it right I did a search online and found one, a free pattern for the pin cushion caddy on FB. This is the link: http://www.facebook.com/note.php?note_id=58737697848THen I also found this http://annamariahorner.com/SEAMS.to.ME.help.pdf
link to Ms. Horner's page with some corrections to her pincushion instructions. I just wanted to share that with you and your readers. Again I want to thank you for the inspiration and clarification.
Thank you SO MUCH for this help!!!
Your directions were fabulous. Thank you so much!
This is what I came up with: http://savvystitch.blogspot.com/2011/05/pincushion-caddy.html
I'm thinking of trying this but building it around an aerosol can lid - save on building the tube and make it a bit sturdier! :)
Thank you so much for your wonderful demonstration here. I'm late to the club in finding this book & pattern and then was quite disappointed as I started to put it together. I was having so many problems that I almost tossed the entire project into a box to be put away forever until I found your demo so thank you for sharing your knowledge and solutions! You saved me and this project!
Great pattern and beautiful fabrics!
You know..I purchased that book and this was the first project I tried...and I could not follow her instructions at all!!
I got to a certain point and soon found myself scracthing my head!!
So glad I found your post... what amazing math skills you have and amazing color choices for your cushions..very talented lady and so generous to share your instructions with us!! Kudos and God bless you!!
Barbyq10
Dear Melanie,
Thank you so much for this exact tutorial, we enjoyed it very much while working!! We like to make others in smaller or bigger sizes. Big Hugs from Berlin,
Kaddi & Biggi
I found this via Pinterest. I'm getting ready to set up a Sewing Studio to start a home-based business. This is a fantastic little project! I will be making some of these for my work spaces! Thank you for posting the Tuturial!
Kelly on FB
Sew Lambitious LLC aka Lambitious Creations on FB
I tried this tutorial from Penny a year ago and had great success.
http://pennyshands.blogspot.com/2010/08/hexie-caddy-tutorial.html
It's a wonderful hand project and not one problem. I've made several!
Same look.
These are SO cute! Does anyone know of a free version with pattern pieces? The fb link mentioned above does not include the pieces. Thanks!
Hi , I just found this. Love the idea! Tried to download the pattern and it will not load. Any ideas?
I made one this weekend! I could not have done it without your wonderful tutorial. Thank you so much for all the helpful info.
I just love the look of of the pin cushions. Someone so new and fresh looking. I rushed over to Amazon and bought the book. I will save your notes to help me make my first one. I belong to a quilt guild and it is hard to find gifts to make for quilters who already own everything they need. LOL Is there a way to contact you directly if I need some help? Thanks for sharing the easier way to finish these pin cushions.
Huggles
Jonell
I believe the pieces are the same as in Wild Flower Pincushion which is free on-line:)
Thank you, thank you, thank you!!
I reduced the pattern size by 25%, but could do 33% too. Math still works beautifully. Leave small openings on opposite sides and stuff from both seems to be helpful - for me. Huge thanks for your very excellent tutorial!
Post a Comment