

We have a friend (who we'll call Mr. Friend) who likes to tease me about being a quilter and keeps asking me where his quilt is. Tonight we are going to dinner with Mr. and Mrs. Friend to celebrate their wedding anniversary. I still haven't unpacked my projects from the retreat and I don't have time to make an entire quilt, but I thought I'd make them a little quilted gift for tonight.
So, here's my quick and easy, quilt-as-you-go (QAYG), scrappy, crazy stitching potholder. I made the gray and red for Mr. and Mrs. Friend last night, and the second one with Hope Valley scraps from my pinwheel sampler today. It's faster without the binding, but either one is pretty quick. I'm going to show you how I made the one without the binding.

- Two pieces of Insul-Bright batting cut about 2" larger than your your desired finished potholder size. I like a potholder about 8", so in that case, you would start with two pieces of Insul-Bright, 10" square.
- One piece of cotton batting cut to your desired potholder size. I used Warm 'n Natural.
- Fabric scraps of various sizes, but nothing too small. Larger scraps = quicker project.
- A walking foot and a point turner (or something similar).
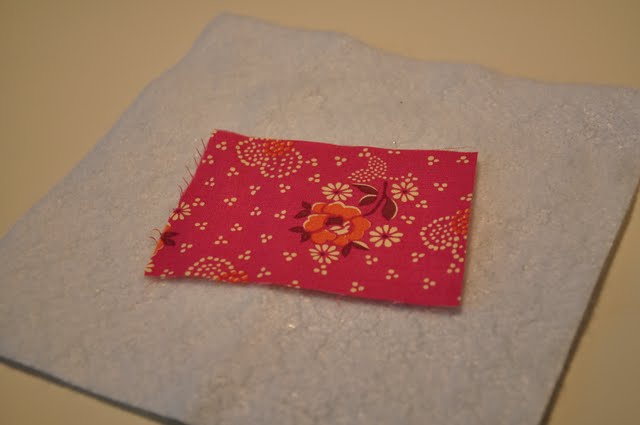
Choose your first fabric scrap and place it in the center of one piece of your Insul-Bright batting. It doesn't need to be straight, this is all very free-form.

With your walking foot attached, choose a spot just outside the edge of the scrap (on the batting) and sew across the scrap in a straight line. I tended to start near, but not on, the corner.

When you get to the other side, sew off the edge of the scrap, raise your presser foot and spin your batting around and sew back over the scrap. My machine has a nifty pivot function so when I stop sewing, it automatically raises with presser foot foot with the needle down and automatically lowers it again when I begin sewing. This is also a nice time to have a knee lift.

Just keep sewing from side to side at random angles to attach the scrap to the batting. Try to sew off the edge of the scrap each time. This won't be as important with the subsequent scraps.

Build your patchwork by adding a scrap approximately the length of one side of your first scrap by aligning the edges as above, right sides together.

Attach with a 1/4" seam allowance,

fold it back and press it flat.

Attach the second scrap with random stitching across the scrap just as you did the first scrap. There's no need to cut your thread until you are finished. Just raise your presser foot when you get to the edge, spin it around and keep sewing.

As you attach additional scraps, try to sew off the edge of the scrap every once in a while. This should ensure that your seams won't get too puffy after washing.

You should end up with something like this.

Keep adding scraps around the outside edge of your growing patchwork. I didn't measure anything, I just laid them atop one another and cut.

In some cases, I attached two scraps together and then sewed them to my patchwork.

In this instance, I sewed three scraps together. No measuring, just eye it and keep going. We want this project to be quick.

You will need to make sure that your new scrap is aligned with the shortest edge of your patchwork. This will hopefully make more sense when you are sewing. If I had aligned the blue swatch with the edge of the green swatch, my batting would be showing above the pink and purple scraps when I flipped it over to press it down.

You'll end up with something like this.

Square it up to approximately 1" larger than your desired finished size. If you want your finished potholder to be 7" square, trim your quilted batting up to 8" square.

All trimmed.

Make another one using the same technique for the opposite side. *If you would rather make the potholder with the binding, see the end of this post.*

When you have two pieces trimmed and ready, lay them atop one another, right sides together, and align the edges on all sides.

Sew around the outside edge (still using your walking foot), about 1/4" from the edge. My seam is a generous 1/4". Leave a large opening on one side as shown above, but be sure to sew all four corners. I just sewed in about 1/2" on each corner of the side I left open. Be sure to backstitch to secure.

Snip off your corners, just don't get too close to the stitching. Press the whole thing flat, concentrating on the seams.

Turn your potholder right side out. Use a point turner (or knitting needle, or something similar) to turn your points. Run your point turner along each stitching line from the inside to make sure your seams are opened all the way out. Iron around the outside edges.
 Insert your cotton batting inside the potholder and smooth it out. If it's too big, trim it a little.


You want the cotton batting to meet the inside edges of your seam allowances, not overlap them.

If you'd like to add a hanging loop, cut a piece of fabric about 6" long by about 1 to 2" wide depending on the desired width of your finished loop. I think mine was 2" wide. Press it in half, right sides together. Sew a 1/4" seam along the open edge, lengthwise.

Turn it right side out and press it flat with the seam in the center of one side.

Go back to your potholder and begin turning in the open edge and securing it with pins. This is why I used a generous 1/4" seam allowance. (I guess a generous 1/4" isn't really a 1/4" at all, but hopefully you know what I mean.)

When you get to the end, insert your hanging loop by doubling it over with the seam to the inside and insert it into the opening at the corner. I left about 1.5" hanging out. Iron the pinned opening flat.

Sew all the way around the outside edge of the potholder about 1/4" inside.

You're almost finished! At this point, you may want to slipstitch closed the edges of the side you originally left open for a cleaner look. I caught all my seam allowances when I sewed around the outside edge, so I didn't bother with it.

You'll want to secure that loose piece of cotton batting inside in case you didn't catch the edges, and I chose a little eyelet stitch my machine does.

But, my potholder was too thick to make pretty eyelets and they ended up being more like wonky ovals. I just laid a small square ruler (I think it was 3") in the center of my potholder and marked the four corners. That's where I put my eyelets. Next time, I think I'll try just taking a few zig-zag stitches back and forth to make a little square of stitching or try tying some perle cotton at those spots.

So, here she is, all ready to go in the kitchen.
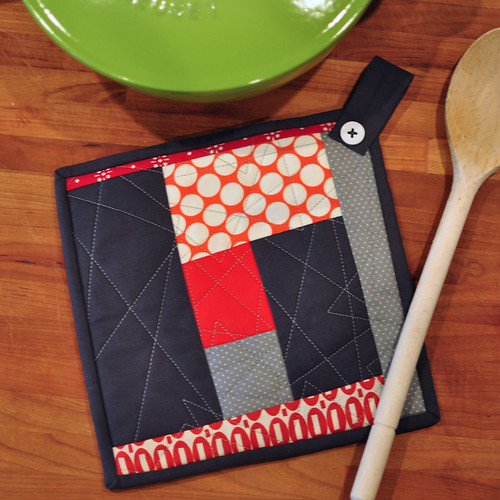
Here is the one I made last night for Mr. and Mrs. Friend. It's easier to see this stitching on this one. They are big Ohio State fans, so I chose red and gray.
I hesitate to post tutorials because I don't want to put something out there that someone else has already claimed, but I'm a firm believer that there is nothing new under the sun. The quilt-as you-go construction was inspired by the technique that Penny used in her quilt-as-you-go quilt. The random layout and stitching came from my own head, but I'm sure someone, somewhere, has done it before.
*If you want to bind your potholder, you would sandwich the cotton batting inside the quilted squares and bind it as you would a quilt. I added a hanging loop to the bound potholder with buttons on each side. Since I was sure I had caught the edges of the cotton batting on the inside when I attached my binding, I didn't add any additional stitching to secure it, but you certainly could.
Enjoy!
24 comments:
Cute! I'm going to believe you invented them. :)
Smart! I'm going to give this a try, my current potholders are ready to be replaced.
Thanks for the excellent tutorial -I love scrappy projects and I love your choice of fabrics. These would make lovely presents.
love these - what a great idea! Thanks for sharing ;)
x
I love the tutorial - understood every word and phrase. Thank you.
Super cute :)
Call me uneducated, but I'm new to using Insul-Bright, and I was told you only needed one layer inside a pot holder. Is this wrong?
I really like this tutorial! Thank you for sharing this!
Ohh, I love this! I will most definitely be trying this out soon. Thank you for sharing!
CUTE! It just happens I have some insulbright. Love it! Love your Le Creuset Pot as well!!!
Very nice tutorial! I haven't come across that random quilting design before. Pivoting is so fun - I can just imagine how nice that feels. Thanks!
thanks for letting us know how to do these nice potholders! i´ll sew some soon, too.
ingeborg
Thank you for sharing these pretty and fun pot-holders with us. Lovely tutorial, will have to try this...
; )
Thank you for your tutorial! The timing is perfect. I'm making some potholders using some of the extra 'Trudy' cross blocks. I wasn't sure how to do the binding bit or how to put them together, and your non-binding method is just what I was looking for. And I didn't even have to search for a how-to online. I just popped up on my Reader. :)
Thanks!
Uh, COOLEST THING EVER! I've never thought of quilting as I'm piecing... super fab.
Cute potholders! I really like your pincushion with the rickrack also!
Love it!! This is very timely for a potholder swap I'm attending. The last potholder I made got all messed up when I went to quilt it because the area was too small. Making this as a QAYG project is just perfect. Thanks for the "original" idea.
Wow, this is fantastic! Thanks so much for the great tutorial. I would love to link to this if you didn't mind.
Whether you invented these or not - I love 'em. I was just telling Hubby the other night that we needed some new potholders. Ours are so raggedy - yuck.
Thanks for sharing your version!!
This is such a wonderful tutorial --- I love patchwork anything! Thanks!!!
Love the second one best!
Thank you for this easy to follow tutorial. I plan to use it to make some real quick for Christmas!
Love this!!! Like the Buckeye one too ;) Is there a button on each side? I'd like to try that method. Thanks!
Melanie,
Of all the scrappy potholders out there, you motivated me to start this easy, quick and always beautiful way of putting together different fabrics. Now, I can't quit!
I do mine a bit differently, but then this creative way to sew can be so refreshingly unique in many ways.
Thanks for sharing.
Danielle
Just LOVE this pattern. I made two for myself and now am making 6 sets of two for my girlfriends. Everyone who sees them can't believe I made them. The look great, are really durable and fun to make! Thanks so much!
Post a Comment